 Pin it
 My sister called me three days before her birthday asking if I could make something that looked like it came from a fancy bakery but tasted like home. I'd never made mini layer cakes before, but there was something about her voice—hopeful, a little uncertain—that made me say yes immediately. That afternoon, I found myself standing in the kitchen with edible flowers spread across the counter like tiny jewels, and suddenly the whole project felt less intimidating and more like creating something magical just for her.
I remember assembling the first mini cake and feeling genuinely nervous—would the layers actually stay in place? Would it look sad and lopsided? But as I spread that buttercream between the delicate rounds and arranged the violas on top, something shifted. My niece wandered in, gasped a little, and that's when I knew these weren't just cakes anymore. They were tiny edible celebrations, and suddenly three hours of prep time felt completely worth it.
Ingredients
- All-purpose flour (1 1/4 cups): This is your cake's backbone—make sure it's not packed down in the measuring cup, or you'll end up with something dense and heavy instead of tender and light.
- Baking powder (1 tsp): Don't skip this or use old baking powder that's been sitting in your cupboard for two years, or your cakes will stay frustratingly flat.
- Salt (1/4 tsp): Just a whisper of it, but it makes the vanilla taste more vanilla and the lemon sing.
- Unsalted butter (1/2 cup for cake, 3/4 cup for buttercream): Room temperature is non-negotiable here—cold butter won't cream properly and you'll be beating it forever.
- Granulated sugar (3/4 cup): This creams with the butter to incorporate air, which is what gives these cakes their tender crumb.
- Eggs (2 large, room temperature): They need to be warm so they blend smoothly into the batter without creating lumps.
- Pure vanilla extract (1 tsp for cake, 1 tsp for buttercream): The real stuff tastes like comfort—don't use imitation unless you have no other choice.
- Lemon zest (1/2 tsp): Use a microplane, not a box grater, so you get the bright oils without any bitter white pith.
- Whole milk (1/2 cup, room temperature): This adds moisture and creates a tender crumb, so don't swap it for something else.
- Powdered sugar (2 cups, sifted): Sifting takes two minutes and prevents lumpy buttercream that looks grainy.
- Heavy cream or milk (1–2 tbsp for buttercream): This adjusts the consistency, so add it slowly and taste as you go.
- Edible flowers: Source these from a reputable seller—farmers markets, specialty cake shops, or online suppliers that verify food-safety—because you're literally putting them in your mouth.
Tired of Takeout? 🥡
Get 10 meals you can make faster than delivery arrives. Seriously.
One email. No spam. Unsubscribe anytime.
Instructions
- Set your oven and prep your pan:
- Preheat to 350°F and line a 9x13 inch baking sheet with parchment paper, then give it a light grease so nothing sticks. This setup takes two minutes but saves you from cake that tears when you try to remove it.
- Combine your dry ingredients:
- Whisk flour, baking powder, and salt together in a medium bowl so the leavening is evenly distributed. This prevents weird dense patches in your finished cake.
- Cream butter and sugar until fluffy:
- Beat them together for about three minutes until the mixture is pale and noticeably lighter than when you started. This is where air gets incorporated, which makes the cakes tender instead of dense.
- Add eggs and flavorings one at a time:
- Drop in one egg, beat well, then repeat with the second egg, vanilla, and lemon zest. Rushing this step means you end up with a curdled-looking batter that still works but doesn't feel quite as elegant.
- Alternate wet and dry ingredients:
- Add half the flour mixture, mix gently, then add all the milk, then the remaining flour, stirring after each addition just until combined. Overmixing here develops gluten and creates tough, chewy cakes, so use a spatula and be gentle.
- Bake on a sheet pan:
- Spread batter evenly onto the prepared sheet and bake for 18–22 minutes until a toothpick comes out clean. The sheet pan method gives you one thin, even cake that's perfect for cutting into rounds.
- Cool completely before cutting:
- Let the cake cool in the pan for about ten minutes, then turn it out onto a wire rack and cool completely. Cutting while warm means the layers will crumble and fall apart, so patience here is essential.
- Cut out twelve rounds:
- Use a 2.5–3 inch round cutter and press straight down without twisting, which gives you clean edges. You'll get twelve perfect rounds from the sheet, which means six mini two-layer cakes.
- Make the buttercream:
- Beat softened butter until creamy, then gradually add sifted powdered sugar along with vanilla and salt, mixing until light and fluffy. Add milk one tablespoon at a time if it needs thinning—you want it spreadable but still holding its shape.
- Tint if desired:
- A tiny dab of pastel food coloring goes a long way, so add it gradually and mix thoroughly for even color. Multiple colors make the display feel more festive and personal.
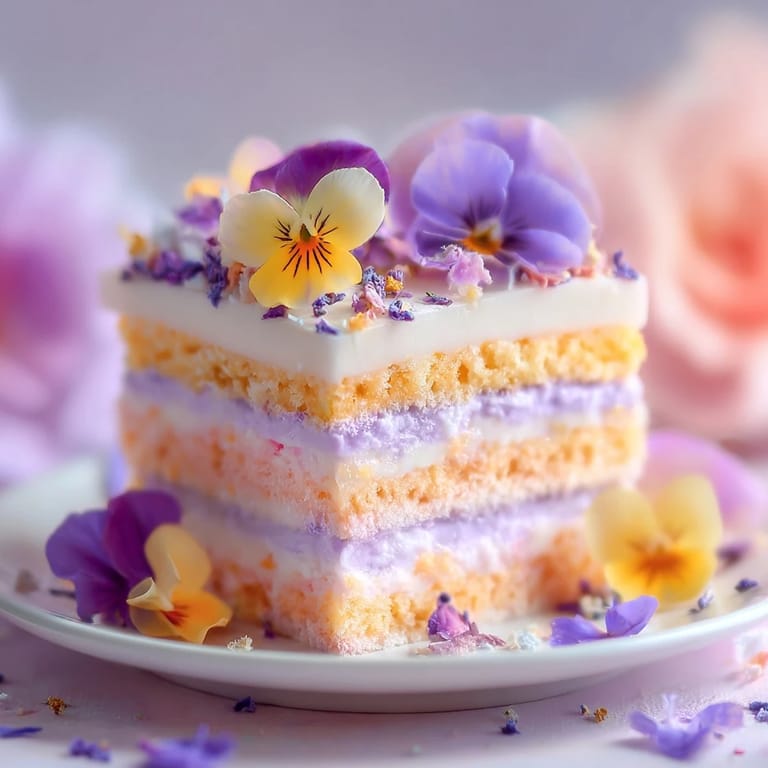
- Assemble the mini cakes:
- Place one cake round on a plate, spread with buttercream, top with another round, and add a thin layer of buttercream on top. Think of it like stacking delicate little sandwiches.
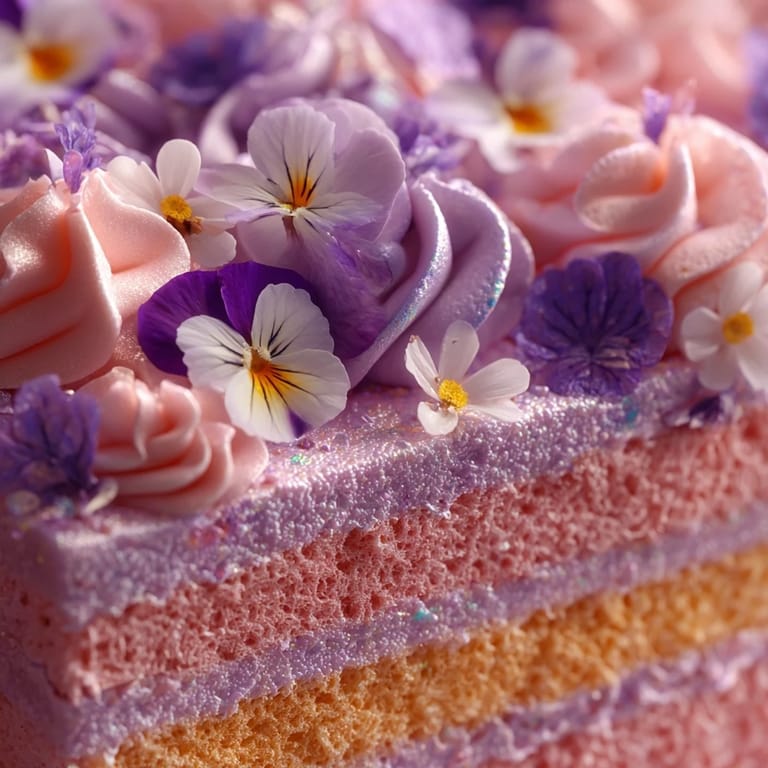
- Decorate with buttercream and flowers:
- Pipe or spread buttercream on top of each mini cake, then arrange edible flowers artfully—don't overthink this, just let them fall where they look beautiful. A few violas look more elegant than a completely covered top.
- Chill before serving:
- Refrigerate for fifteen minutes so the buttercream sets and the cake firms up just enough to hold together when someone picks it up. This makes them feel more polished and prevents buttercream from sliding off.
 Pin it
 As we placed each finished cake on the dessert table for my sister's party, I watched people stop mid-conversation when they saw them. Someone asked if I'd bought them from a bakery, which made me laugh—but honestly, that moment of people caring enough to really look at food I'd made felt like the real celebration. These little cakes became the thing everyone remembered about that afternoon.
The Magic of Sheet Pan Cakes
Baking a thin, even cake on a sheet pan instead of in traditional layer pans changed everything for me. You get a uniform thickness that cuts cleanly into perfect rounds, and there's something satisfying about working with one simple slab of cake instead of fussing with multiple pans. Plus, cleanup is easier, and you can get more cake from the same amount of batter because nothing gets wasted in the sides of a pan.
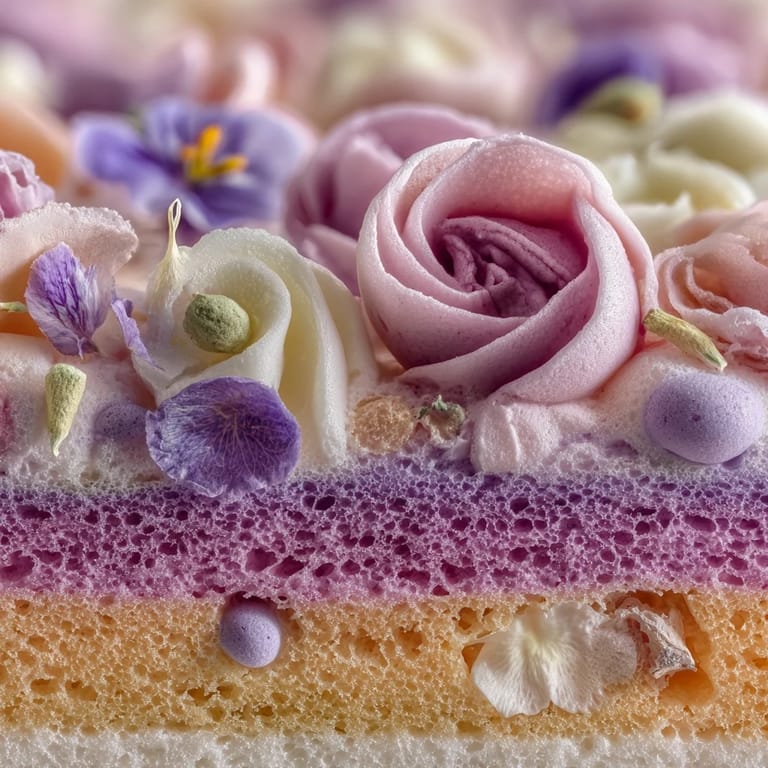
Why Edible Flowers Matter More Than You Think
The first time I tried to make these cakes without flowers, they looked pretty but somehow felt incomplete—just buttercream and cake, nothing unexpected. Adding edible flowers transforms them from nice to genuinely memorable, and I realized it's because they introduce an element of surprise. People expect flowers to be beautiful but inedible, so when they discover these are actually meant to be eaten, it changes how they experience the whole dessert.
Flavor Combinations That Work
Vanilla and lemon might sound simple, but together they create something that feels more sophisticated than either flavor alone. The vanilla is warm and grounding, while the lemon zest adds brightness without any sharp citrus bite—it's a combination that appeals to almost everyone. If you want to experiment, a touch of almond extract can replace half the vanilla, or you could brush the cake layers with a light citrus syrup before assembly for even more flavor complexity.
- A tiny brush of lemon simple syrup between layers adds moisture and amplifies the citrus without overwhelming the vanilla.
- Pastel buttercream colors make each cake feel individual, even though they're all made from the same batches of cake and frosting.
- Edible flowers must be sourced from food-safe suppliers—farmers markets, specialty bakeries, or trusted online vendors that verify pesticide-free growing.
 Pin it
 These mini cakes taught me that sometimes the most elegant thing you can make is also the most manageable. They're the kind of recipe that makes you feel like a pastry chef without requiring special skills, and they taste like you genuinely care—which, when you're celebrating someone, is exactly the point.
Recipe Questions & Answers
- → What makes mini spring layer cakes unique?
The combination of vanilla and lemon zest infuses a fresh, delicate flavor, while the edible flowers add a colorful, natural decoration enhancing the cakes' appeal.
- → Can I use different edible flowers for decoration?
Yes, using food-safe, pesticide-free edible flowers like violas, pansies, or nasturtiums allows for creative variations in color and texture.
- → How can I achieve a light and fluffy buttercream?
Beat softened butter until creamy, then gradually add sifted powdered sugar, vanilla, and a splash of milk, continuing to whip until airy and smooth.
- → What is the best way to assemble these layer cakes?
Cut cooled cake into rounds, layer each with buttercream, and top with additional buttercream and edible flowers for a neat and attractive finish.
- → How long should the mini cakes chill before serving?
Chill cakes for about 15 minutes to set the buttercream and improve texture before serving for the best experience.
- → Are there any allergen considerations to keep in mind?
These cakes contain wheat, eggs, and dairy. Edible flowers may also pose allergen risks; verify individual flower types before use.