 Pin it
 The first time I understood why Black Forest Cake matters, I was standing in a Viennese café on a gray afternoon, watching an older woman close her eyes over the first bite. She wasn't performing elegance—she was genuinely lost in the flavors, that deep chocolate mingling with tart cherries and soft cream. Years later, I realized I could create that moment at home, and the day I pulled my own layered cake from the oven, my kitchen smelled like something transcendent. This cake isn't just dessert; it's an edible memory of European tradition that somehow feels personal the moment you make it.
I once made this cake for a dinner party where I'd promised something 'light and simple'—which was foolish on my part. Halfway through assembly, I realized I'd underestimated how much joy layering could bring. Watching my guests take their first forks through those four chocolate layers, hit that unexpected tartness of cherries, then sink into the cream... that's when I understood this cake was worth every minute of the work.
Ingredients
- All-purpose flour: The foundation—measure it by spooning into your cup and leveling off, never scooping straight from the bag, which packs the flour and makes your cake dense.
- Granulated sugar: Creates structure and moisture; this cake's thin batter actually needs it to stay tender.
- Unsweetened cocoa powder: The soul of the cake—use Dutch-processed if you can find it, as it creates a deeper, more sophisticated flavor.
- Baking powder and baking soda: Together they lift the batter and balance the cocoa's slight bitterness.
- Eggs: Room temperature eggs emulsify better with the oil, creating a silkier crumb.
- Whole milk: Thinned with boiling water, it actually makes the cake more tender because the batter is nearly pourable—trust this, it works.
- Vegetable oil: Keeps the cake moist longer than butter alone would; it's the secret to day-two freshness.
- Vanilla extract: A small anchor that makes chocolate taste more like itself.
- Dark sweet cherries: Fresh are beautiful, but jarred ones work reliably—the syrup they're packed in becomes your filling liquid.
- Cherry juice or syrup: This is your glue—brush it between layers so they don't slide around during assembly.
- Kirsch: Optional, but those few tablespoons add a whisper of sophistication that guests can't quite identify.
- Heavy whipping cream: Must be cold, and this is not the moment to skim on quality; cheaper cream sometimes won't whip properly.
- Powdered sugar: Creates the right texture for stable whipped cream that won't weep.
- Dark chocolate for shavings: A vegetable peeler becomes your best tool here—room temperature chocolate breaks, cold chocolate shaves like magic.
Tired of Takeout? 🥡
Get 10 meals you can make faster than delivery arrives. Seriously.
One email. No spam. Unsubscribe anytime.
Instructions
- Set your stage:
- Preheat your oven to 350°F and grease both pans generously, then line them with parchment paper cut to fit the bottoms—this prevents the thin batter from sticking to the edges. While you're at it, pull your cream from the fridge because cold cream whips faster and fluffier.
- Build your dry base:
- Sift your flour, sugar, cocoa powder, baking powder, baking soda, and salt together into a large bowl—the sifting aerates everything and prevents lumps that would hide in the finished cake. This small step makes a real difference.
- Come together, batter:
- Add your eggs, milk, oil, and vanilla to the dry ingredients and beat until smooth, then slowly add boiling water while mixing. Yes, the batter looks thin—almost like melted ice cream—but this is exactly what creates that tender crumb.
- Bake with patience:
- Divide the batter evenly between your pans and slide them into the oven for 30 to 35 minutes, until a toothpick poked in the center comes out clean with just a few chocolate crumbs clinging to it. Don't open the oven door before 28 minutes, and don't be tempted to overbake—moist cake matters here.
- Cool strategically:
- Let the layers sit in their pans for 10 minutes (this prevents them from breaking), then turn them out onto wire racks to cool completely—this takes time, so patience is your friend. If you try to layer warm cake, it will crumble and slide.
- Prepare your cherries:
- In a small saucepan, combine your cherries, juice, and sugar, then bring to a gentle simmer. Stir your cornstarch mixture into cold water, then whisk it into the simmering cherries until the liquid thickens into a glossy sauce—this takes about 2 to 3 minutes, and you'll see it transform from loose to luxurious. Remove from heat and add kirsch if using, then let it cool completely so it doesn't melt your cream later.
- Whip your cream to clouds:
- With cold cream, cold bowl, and cold beaters, whip your heavy cream with powdered sugar and vanilla on high speed until stiff peaks form—firm enough that the peaks stand straight up. Keep it chilled until assembly.
- Slice for layers:
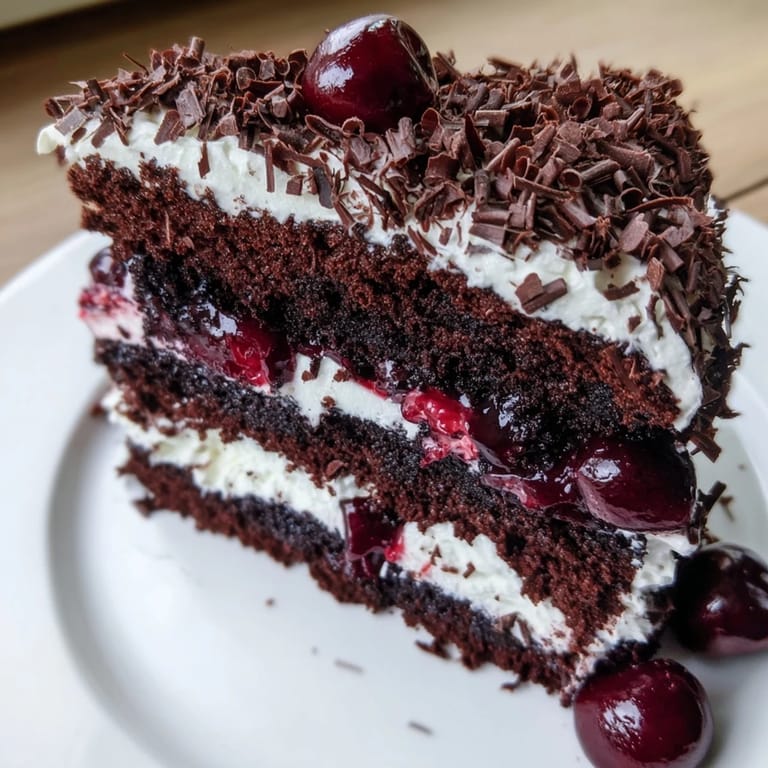
- Using a serrated knife and a gentle sawing motion, slice each cooled cake layer in half horizontally to create four layers total. A turntable helps, but a steady hand and patience work too.
- Build with precision:
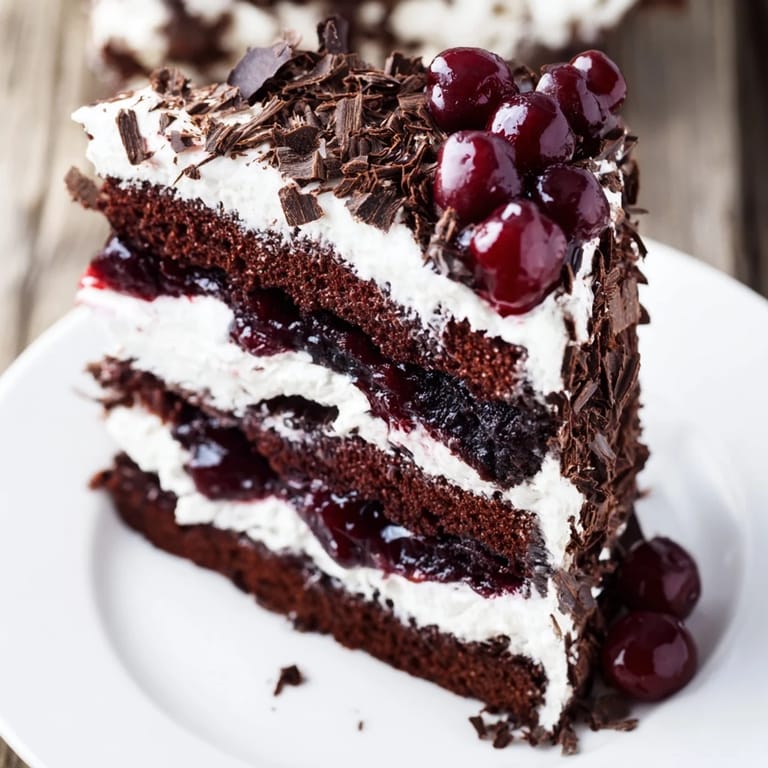
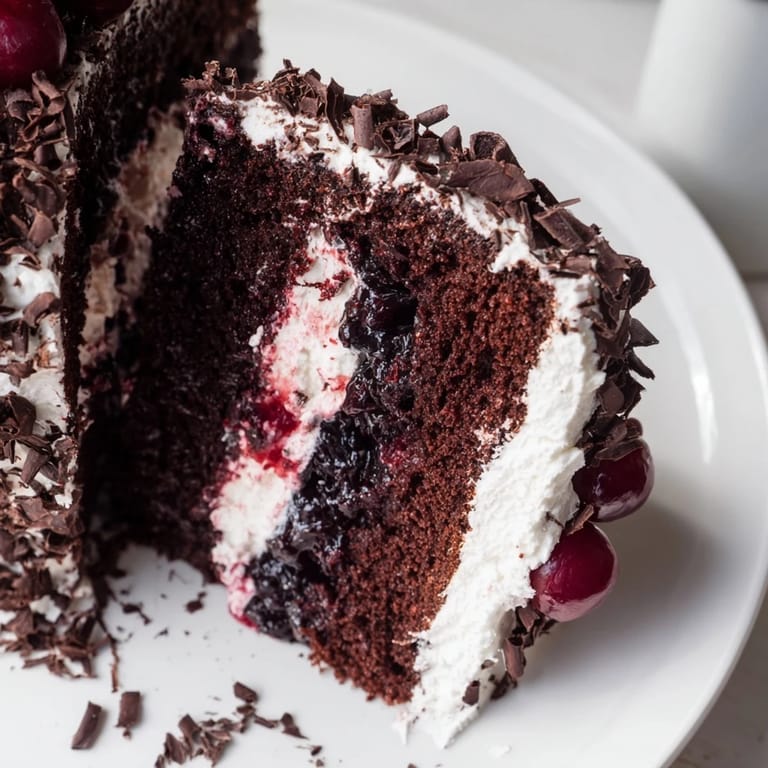
- Place your first cake layer on a serving plate and brush it lightly with cherry syrup until it glistens, then spread with cherry filling and a generous dollop of whipped cream. Repeat with the second and third layers, then crown the cake with the final layer.
- Finish with elegance:
- Spread whipped cream over the top and sides, then decorate with chocolate shavings made with a vegetable peeler and fresh or maraschino cherries placed artfully. Chill for at least an hour so everything sets and flavors meld.
 Pin it
 I remember plating a slice for my teenage niece who usually couldn't be bothered with 'fancy desserts,' and watching her fork actually pause before the second bite—not because something was wrong, but because she'd noticed the cherries. That little moment, where someone slows down to actually taste what you've made, is what this cake is really for.
The Chocolate Cake Foundation
This cake is built on a technique that feels counterintuitive until you taste it. The thin batter—nearly the consistency of brownie batter mixed with water—is actually the key to tenderness. When you add boiling water at the end, you're not diluting the cake; you're creating steam that ensures a tender, almost fudgy crumb that stays moist for days. The cocoa powder provides deep chocolate flavor without adding extra fat, so the oil keeps everything from drying out. It's a calculation that German bakers understood long before modern food science explained why it works.
Assembly as an Act of Care
There's something meditative about layering this cake. Each brush of cherry syrup, each spread of filling, each swirl of cream becomes a small choice—am I being generous or restrained? Do I want visible layers or a seamless finish? The cake doesn't demand perfection; in fact, its charm often lies in the slightly uneven frosting or the cherry that slides just an inch too far. This isn't a cake that rewards precision so much as intention. You're not following instructions so much as having a conversation with the cake about what it wants to become.
Storage and Serving Wisdom
Black Forest Cake actually improves slightly on day two as the flavors meld and the chocolate settles into the cream. Store it covered in the refrigerator for up to three days, and bring it to room temperature for 15 minutes before serving so the chocolate becomes silky rather than cold and brittle. If you're serving it at a dinner party, assemble it the morning of or up to a day ahead—the chilling time helps everything stabilize, and you'll feel calmer knowing it's already done.
- For an alcohol-free version, simply omit the kirsch and use extra cherry syrup instead—the cake loses nothing.
- Jarred sour cherries are actually traditional and sometimes preferable to sweet ones, as they provide the contrast that makes chocolate taste richer.
- Make the whipped cream just before assembly so it stays fluffy and cold throughout the process.
 Pin it
 This cake taught me that sometimes the most impressive things come from following someone else's tradition faithfully, then making it your own through the care you pour into each layer. Every time you make it, it gets easier and tastes better.
Recipe Questions & Answers
- → What cherries work best for filling?
Dark sweet pitted cherries, either fresh or jarred and drained, provide a rich, tart flavor ideal for the filling.
- → Can kirsch be omitted in the filling?
Yes, kirsch is optional. Substitute with extra cherry syrup for a non-alcoholic version without compromising flavor.
- → How to achieve stiff peaks for the cream?
Beat cold heavy cream with powdered sugar and vanilla on high speed until peaks hold shape firmly without falling.
- → What is the best way to cool the cake layers?
After baking, cool the cake layers in pans briefly, then transfer to wire racks to cool completely before assembly.
- → How to make smooth chocolate shavings for decoration?
Use a vegetable peeler on a chilled dark chocolate bar to create delicate, even chocolate shavings.